7. Settings
In the panel Settings of File menu you can set different settings which are important, but usually are changed very seldom.
Please select File in the main menu top left and then select Settings:
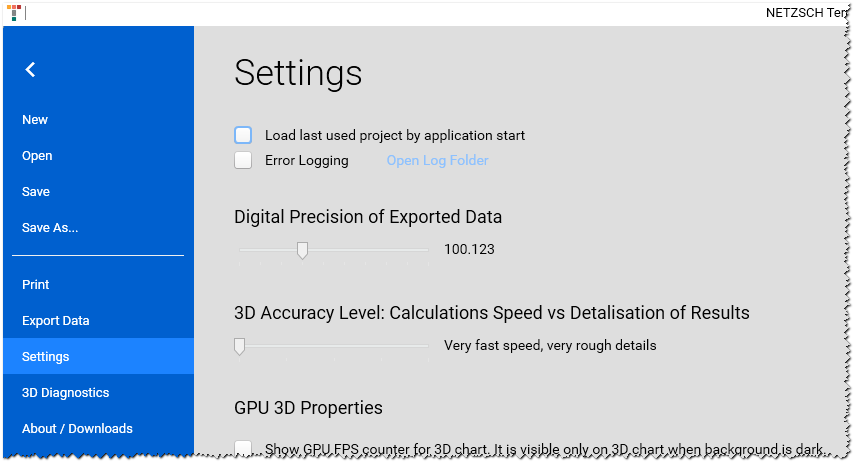
7.1 Last used Project

When selected, the last project you worked with will be automatically loaded into Termica Neo when you start the software.
Default: off.
7.2 Error Logging

When selected, all errors occur in the software are recorded into the log file. This is a text file, and it can be set to the developers to recognize the problem and to prepare the software fix.
Default: off.
7.3 Digital Precision of Exported Data
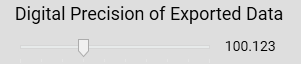
When you export the data, this setting can help you to define the number of decimal places of the output data. You can move slider and check the representation of the selected number of decimal places on the sample value on the right side from the slider.
Default: 3 decimal places.
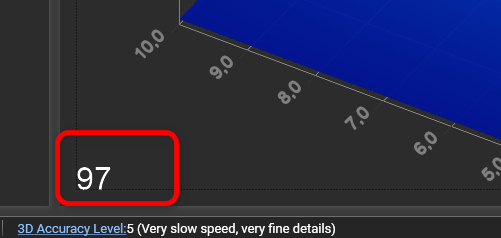
7.4 3D Accuracy Level

This is very important setting when you work with 3D visualizations in Termica Neo.
The process of digital simulation of the 3D data can take some minutes, especially when the processor of your computer is not very fast. This is because the higher level of details is selected the more nodes must be simulated for each time layer, and they are processed longer.
There are 5 levels of details of the results:
-
Very fast speed, very rough details,
-
Fast speed, rough details,
-
Normal speed, normal details,
-
Slow speed, fine results,
-
Very slow speed, very fine results.
It is recommended to set this setting to (1) or (2) for the beginning. When the prediction parameters are determined and the final results must be presented, then you may select Level (3) or (4).
7.5 GPU 3D Properties
7.5.1 Show GPU FPS Counter

This is another benchmark of the possibility of your computer to render 3D graphics in Termica Neo. Frames Per Second (FPS ) shows the possibility of your computer hardware to process the 3D graphics. It is important to switch this setting “on” when you feel that the 3D charts are processed very slow when you rotate them.
When this option switched on, then it gives you the possibility to see FPS benchmark in the lower left corner on the 3D chart in Termica Neo.
IMPORTANT: FPS benchmark is always shown white. You need to select dark visual theme to see the benchmark! Otherwise it will be shown, but not visible.
Default: off.
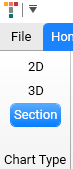
7.6 Section Chart: Playback and Video
These settings are important only in Section Chart Type.
This setting controls the duration and smoothness of the automatic playback and recorded video of the Section charts. For details see 5.5 Chart Type: Cross-Section / 3D Surface View .
7.6.1 Auto Playback Duration

The duration of the automatic playback for the whole prediction time range, or from the beginning of the time frame slider to the end of it. It is independent on the time settings defined in the prediction itself.
Default: 10 seconds.
7.6.2 Playback Frame Rate

This parameter determines how many frames will be shown for each second during automatic playback.
If you select small value then the playback will be not very smooth, but easy for your computer hardware.
If you select a big value then the playback will be more smooth, but sometimes the computer hardware may be overloaded and the playback can be also not smooth.
It is important to find a good compromise between the results you want to get and these two parameters for your hardware.
Default: 10 frames per second.
7.6.3 Video Folder

Termica Neo can record videos during automatic playback in Section view. Actually the videos are recorded in AVI format with MPEG compression to save disk space.
This parameter defines the default file folder for recorded videos. It is very important when the software gives names for the recorded video by itself (see parameter 7.6.4 Automatic Naming of Video Files).
Default: C:\Users\Public\Videos
7.6.4 Automatic Naming of Video Files

Termica Neo can record videos during automatic playback in Section view. It is possible either to name the files automatically or select the name for each recorded file manually.
On (Selected): the file name for the video to be recorded is created automatically and consists of:
-
Software name: Termica Neo,
-
Name of the loaded project,
-
Name of the selected prediction.
Off (Unselected): you select the name and path for the video file manually before each recording.
Default: on.
7.6.5 Auto-Detection of Time Units on Chart
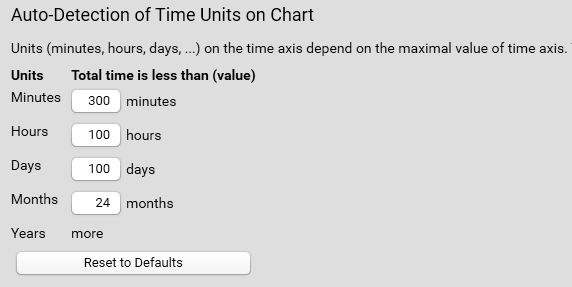
The units for time axis are selected automatically dependent on the total time length. The maximum time in simulation could be some minutes or years. That's why for such different values the different time units must be used.
You can define here what time units will be used on the charts depending on total value length. For default time settings (see screenshot above), the time axis will show hours when the maximum time in simulation is in the range between 300 minutes (= 5 hours) and 100 hours.